Before a plant accession record can be tied to a location, you must first add and define your garden locations in the database.
| This article explains setting up your garden locations in the IrisBG Locations screen under the Management group. |
In this article guide, we will focus on these screen functions.
| Add an item | |
| Add a subitem | |
| Delete an item | |
| Expand all | |
| Collapse all |
We will also explain these fields below.
Table of Contents
- Organize garden locations with a unique Code and Name
- Assign a (Location) Type*
- Enter a Map reference*
- Assign an Item type*
- Enter Coordinates*
- Select a Publish status
- Select an Active status
*optional
Organize garden locations with a unique code and name
Assign each garden location a unique Code and Name. The code must be unique at its level. Sub-level codes belonging to different parents can be the same.
In the example below, we clicked to add a new location. We entered "ROSE" for the code and "Rose Garden" for the name.
To add a new sub-location, select your parent location and click . These sub-locations are also know has Children locations.
| Click |
'Rose Garden' is the Parent location.
'Rose Garden Quadrant 1' - 'Rose Garden Quadrant 4' are the Children locations.
💡TIP! The position of a location in the tree view can be changed by placing the mouse pointer in the leftmost field and dragging the line(s) to a new position.
- Drag a location to the parent to make it a child.
- Drag a child location to the parent while pressing the Shift key to place it at the parent level.
Assign a (Location) Type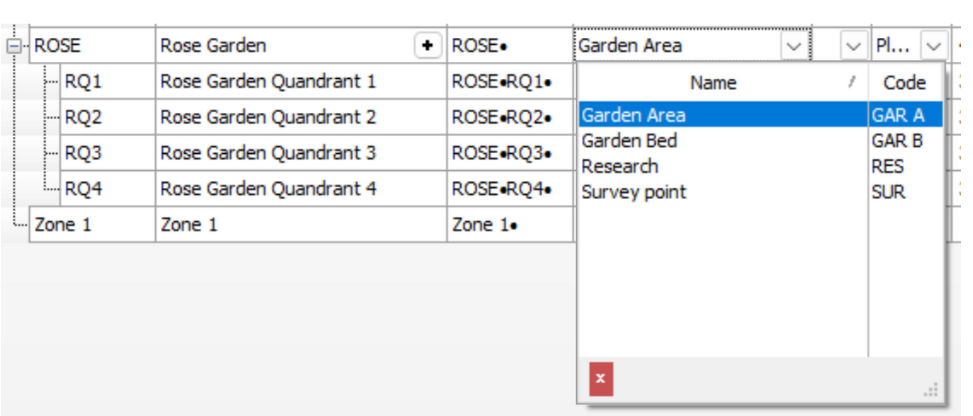
|
Definitions > Location types screen
|
|
Assigning a Location type is optional. Here, we have assigned the Location type, "Garden Area" for the Rose garden and "Garden Bed" for each of the Rose quadrant sublocations.
You can read more about Location types in the guide, Add Location types for Garden Explorer Features.
As default, location codes are shown in short format in the Accessions and Item management screens.
| This can be changed to the long format by setting Long location code = true in the database's Options screen located in the File menu. |
Enter a Map reference
The Map Reference field can be used to record a grid reference, but it is unnecessary if map coordinates are given.
Assign an Item type
If you like, you can assign a specific planting type to a location.
In the example below, we have selected our preserved material item type, Herbarium P, to our Herbarium_Preserved location.
|
|
|
|
Doing so will allow only this item type to be selected in the Accession Items screen (Collections > Accessions: Items) for all items in the Herbarium.
|
Alternatively, leaving the field blank will allow any item type to be selected.
Enter Coordinates
Adding coordinates for your garden areas and beds allows plants without recorded coordinates to be mapped in a general location. The coordinates should be the center point of the location.
There are three different ways this data can be entered:
- Manually
- Drag and drop
- Use the Data import module
1. Manually
To manually enter the geographical data for a location, enter the coordinates directly in the Coord. lat. │x and Coord. long. │y fields.
💡Tip! Need to clear coordinates from their fields? Press Ctrl+Delete.
2. Drag-and-drop
If exact geographical data is not known, our mapping module's drag-and-drop function is an easy way to record your locations' coordinates.
Click on the in the Coord. long. │y field to generate the map display.
Zoom in and out with your mouse or use the Zoom bar. .
Drag and drop the marker on the garden area or bed that correlates to your location.
Adjust your marker as needed.
Click Select and close .
Click Save .
The new locations can now be viewed on the map.
|
💡Tip! Need to change the Map view? Click the dropdown to select the desired map. |
Here, we chose the map, Oslo ArcGis from the drop-down.
3. Use the Data import module
You can also collect GIS coordinates for Garden locations and use the Data import module to upload them. See our guide on using the data import to download a template for uploading garden location coordinates.
💡 TIP! We recommend creating a location named 'Unknown' for plants or plant material not yet mapped.
⏭ Learn how to move your plants from one location to another one in Step 2 of the article, Divide one garden location into two new locations.
Make a Publish selection
- Locations with Publish = Full will appear in uploads to Garden Explorer.
- Locations with Publish = Partial will not be shown in Garden Explorer.
- Locations with Publish = No will not appear in Report or uploads to Garden Explorer.
When Publish is not given, a Location will inherit the Publish value from its nearest parent.
Select an Active status
Are there locations in your data that are no longer existing? To preserve the history of the garden location and the plants that once grew there, do not delete. Instead, set the Location with Active = No so that the location can not be used when entering new data.
Comments
0 comments
Please sign in to leave a comment.